

You’ve most likely seen powerlifters deadlifting or squatting with chains draped from their barbells.
It seems and sounds badass — however it’s not only for present.
Placing chains (in addition to bands) in your barbell is known as accommodating resistance, and it may be a useful gizmo that will help you break via lifting plateaus and hit new PRs.
As you elevate a barbell to which chains have been connected, the chains step by step rise off the ground, rising the load because the barbell will get larger.
It’s also possible to get this variable resistance through the use of elastic bands. You connect one finish of the band to the barbell and the opposite finish to an anchor close to the ground. On the backside of the elevate, the bands are slack, however as you elevate the barbell, the band stretches and will increase rigidity, making the barbell really feel heavier as you get to the highest of the elevate.
Again in my powerlifting days, my barbell coach, Matt Reynolds, included chains and banded lifts into my programming fairly a bit. I actually loved them as a result of they added selection to my coaching and helped me get previous some sticking factors in my lifts that had plagued me for months.
To assist stroll us via the advantages of accommodating resistance and the right way to incorporate it into your programming, I hopped on the horn with Matt to get his insights and recommendation.
A Transient Historical past of Accommodating Resistance
The concept of various resistance via a elevate’s vary of movement has been round for the reason that early days of energy coaching. Early Twentieth-century strongmen would use chains of their workouts to fluctuate the load throughout the elevate. Within the mid-Twentieth century, Soviet powerlifting legend Vasily Alekseyev would do his lifts in waist-high water so as to add some accommodating resistance to his train.
It wasn’t till the Nineties that accommodating resistance grew to become a preferred software amongst powerlifters. And the person who had the largest affect in spreading its use was Louie Simmons of Westside Barbell.
Simmons started attaching heavy chains to barbells to accommodate the physique’s altering leverage all through the elevate. He later began utilizing elastic bands along with his lifters instead means to supply accommodating resistance.
Why Use Accommodating Resistance
Right here’s what accommodating resistance provides:
Matches Your Power Curve. The most important motive you’ll use accommodating resistance is that it makes the elevate match your energy curve: you’re stronger on the prime of lifts just like the squat and bench press than you might be on the backside.
As you elevate a barbell outfitted with accommodating resistance, the chains step by step rise off the ground or the bands stretch, rising the load because the barbell goes larger and better and getting the heaviest on the prime of the motion. Thus, the elevate is lighter on the backside, the place you’re weakest, and heavier on the prime, the place you’re strongest. “By rising the resistance as you progress into the stronger elements of your elevate, you recruit extra muscle fibers, which helps with energy and hypertrophy,” Matt advised me.
Will increase Energy and Bar Pace. “Accommodating resistance forces compensatory acceleration,” Matt says. “You’re type of in a race to the highest. The bar will get heavier as you elevate it, so it teaches you to push more durable all through.” This develops explosive energy by requiring a excessive price of steady pressure.
Overcomes Sticking Factors. Sooner or later in your coaching profession, you’ll uncover you will have sticking factors — locations within the elevate the place you’ll be able to’t appear to go any additional. For instance, I had a interval the place I used to be having hassle locking out my bench press. I began including chains to the elevate and since the barbell acquired heavier because it moved up, I used to be capable of actually practice getting via lockout. As soon as I took the chains off, the barbell simply felt tremendous gentle all through the elevate.
As Matt explains, as a result of accommodating resistance overloads the elements of a elevate the place you’re sturdy and retains the burden gentle the place you’re weak, you get “extra velocity going into the sticking level; you usually get larger up and in a greater leverage place earlier than the sticking level actually catches up with you.”
Challenges your muscle groups otherwise. Accommodating resistance, particularly within the type of bands, forces you to stabilize the bar. It additionally improves bar management and requires you to remain tight all through the elevate.
Chains vs. Bands: Execs, Cons, and Finest Makes use of
There are two methods so as to add accommodating resistance: chains and elastic bands. Each has its professionals and cons:
Chains. Chains present a resistance curve that deloads and masses in a extra linear means in comparison with bands. As Matt defined, “They don’t actively pull down on the bar; normal gravity applies.” That makes them simpler to regulate and extra forgiving. Chains are straightforward to arrange. Simply grasp some chains from the bar. (I’ll present you ways under.) They’re splendid for learners and wonderful for matching the energy curve whereas nonetheless serving to with sticking factors.
Bands. Bands supply extra excessive variable resistance. “Bands truly enhance the pace of gravity,” Matt mentioned. “What I imply by that’s for those who let go of the bar, it might fall quicker than gravity alone as a result of the band is actively pulling the bar down.” Bands additionally introduce horizontal forces, so in case your type is off, you’ll know. They’ll yank the bar out of alignment, making them much less forgiving however more practical for exposing weaknesses.
They’re additionally extra intense, which makes them higher for superior lifters searching for explosiveness. The opposite upside of bands is they’re cheaper and quieter than chains. You need to use bands at a public fitness center with out inflicting a clanging metallic ruckus.
One of many downsides of bands, I feel, is that they’re type of a ache to arrange. You want a squat rack that may help you use band pegs. And it’s a must to be sure you place the bands on the barbell evenly in order that every thing stays good and easy throughout the elevate and also you’re not getting pulled in several instructions.
When to Use Chains or Bands
Begin with chains for those who’re new to accommodating resistance. They’re extra forgiving and assist you construct confidence in your lockout with out compromising type. Bands are higher for knowledgeable lifters who wish to practice explosively and work on bar management and pace.
“Whenever you’re actually attempting to get quick and explosive, bands are most likely the higher alternative,” Matt famous. “However for hypertrophy and studying to get via sticking factors, chains are superior.”
How one can Program With Accommodating Resistance
Right here’s Matt’s steerage on programming:
- Use accommodating resistance not more than as soon as per elevate per week.
- Favor chains if longevity is the aim; bands for brief bursts of explosive coaching.
- Use bands for 4–6 weeks earlier than deloading and taking a break from them.
- Use chains for six–8 weeks earlier than deloading and taking a break from them.
The rationale there’s a differential within the size of time you’ll be able to practice with chains versus bands is that bands are more durable on the physique whereas chains are simpler.
Use Accommodating Resistance in Your Supplemental Lifts
Matt thinks probably the greatest methods so as to add accommodating resistance is to make use of it together with your supplemental lifts. That’s how he programmed it for me after I was utilizing it often.
A pattern week of barbell coaching with accommodating resistance would possibly appear like this:
- Higher Day 1: Fundamental Carry — bench press; Supplemental Carry — chain shoulder press
- Decrease Day 1: Fundamental Carry — squat; Supplemental Carry — chain deadlift
- Higher Day 2: Fundamental Carry — shoulder press; Supplemental Carry — chain bench press
- Decrease Day 2: Fundamental Carry — deadlift; Supplemental Carry — chain squat
Setting Up Your Barbell for Chain and Band Work
To get the total advantage of accommodating resistance, setup issues. Right here’s the right way to do it proper:
Chains
I acquired my chains from Rogue Health. I acquired the 5/8″ chain package, and it comes with:
- (2) 15LB lengths of 5/8″ chain with carabiners. I’d get two extra 15LB lengths of the 5/8” chain, so that you’ll have 30 kilos of whole chains to work with.
- (2) 4′ lengths of 1/4″ chain with carabiners. That is your chief chain that you just’ll grasp out of your barbell. When you’ve acquired that chief chain hanging from the barbell, you’ll grasp the heavier 15LB chain lengths on it.
Along with a sequence set, get your self some EZ Straps. They make attaching chains for deadlifts a breeze. Extra on that in a second.
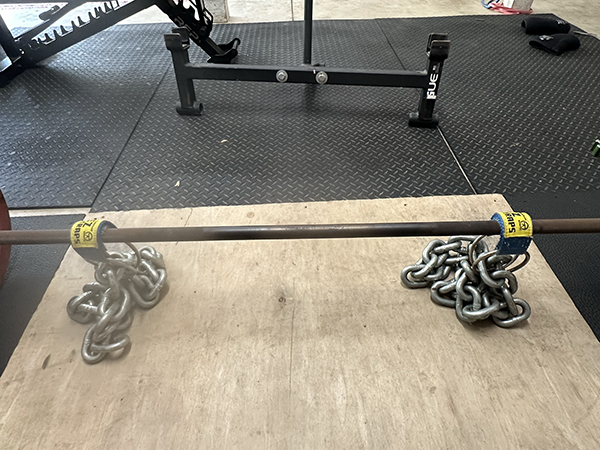
Safe the Chains to the Bar
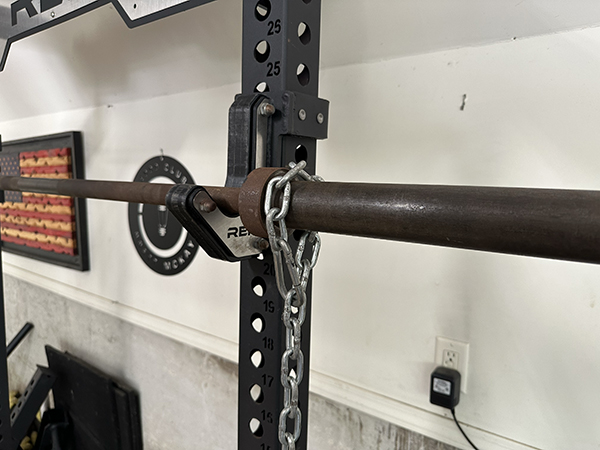
For bench, squat, or press, you’re going to loop the small chief chain across the barbell sleeve, like so.
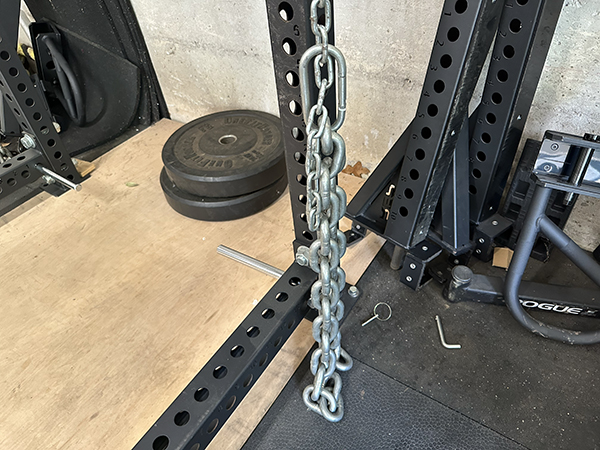
Then connect the large ol’ heavy chains to the chief chain with a carabiner. Connect the carabiner to the chief chain in order that if you’re on the prime of your elevate, one or two chain hyperlinks ought to nonetheless be on the ground.
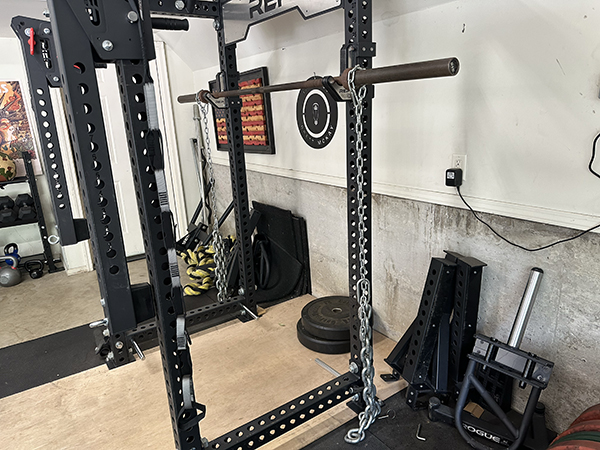
Ought to appear like the above when all is claimed and performed.
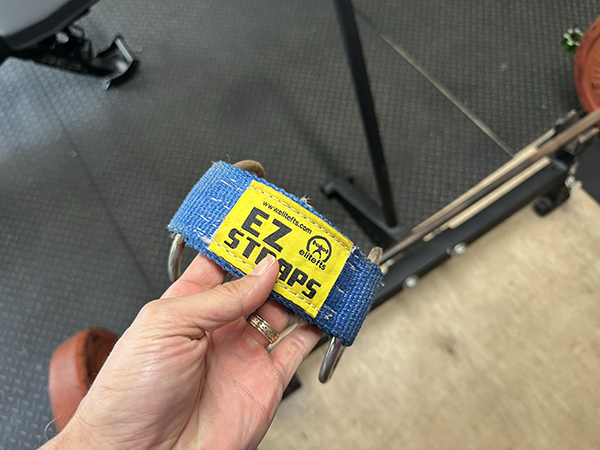
For the deadlift, simply place your EZ Straps on the deadlift bar and thread your chains via the rings.
Tremendous straightforward!
Bands
In my view, bands are type of a ache within the butt to arrange. For those who don’t set them up evenly on either side, your elevate goes to be screwy.
It’s also possible to use bands on weight machines for those who’re a machine man.
Deadlift
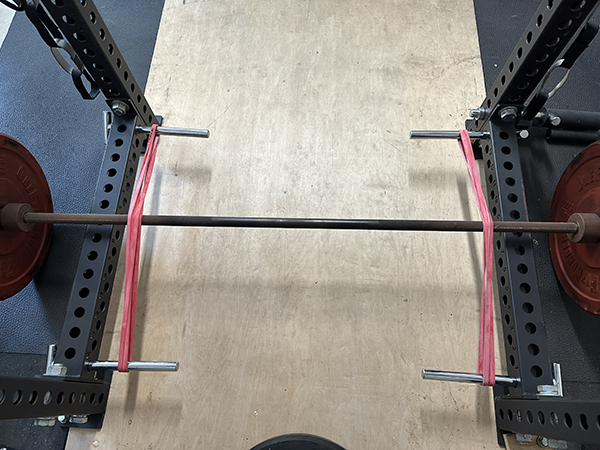
Anchor the bands to band pegs in your squat rack. You’ll want 4 pegs like above. For those who don’t have band pegs, you’ll be able to loop them round heavy dumbbells, however anchored bands are safer.
Begin with gentle or medium bands. Whenever you arrange your bands, the band ought to have slight rigidity, even on the backside of the elevate. This may sometimes require you to double up the bands.
Squat
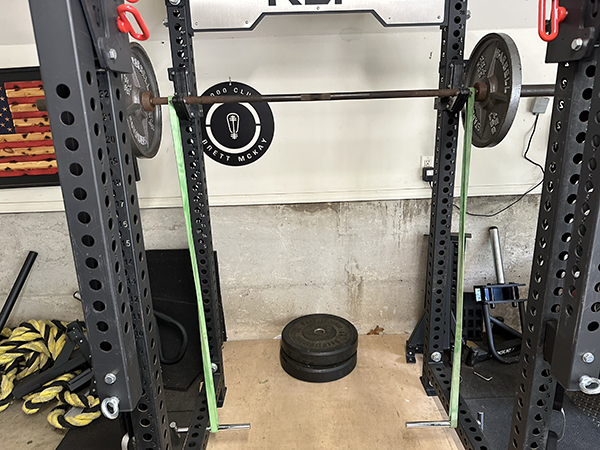
You’ll additionally want band pegs for the squat. Place the band pegs in the midst of the rack the place your midfoot can be if you unrack and stroll again the burden.
Bear in mind, bands pull down more durable than gravity, so that you gotta keep tight and managed throughout the reducing part.
By incorporating accommodating resistance, you’ll be able to practice extra explosively, recruit extra muscle fibers, and bust via your sticking factors.
And if you’re utilizing chains, you’ll appear like a badass doing it.
Give it a try to quickly you is perhaps hitting a brand new PR.